Sunday, December 15, 2013

LAUKI KA KOFTA


Bottle gourd is known for its health benefits. Other than regular simple dishes made with this vegetable, yummy koftas too can be made. You may prepare the gravy as you make for chana / rajma or make it a bit special as you do for malai kofta and soak the lauki ka kofta in the gravy. 

Serves 4


Ingredients
For koftas

  1. Bottlegourd (lauki) - 500 gms
  2. Besan (gram flour) - 5-6 tbsp
  3. Red chilli powder - 1 tsp
  4. Coriander powder - 1 tsp
  5. Asafetida - a pinch
  6. Salt to taste
  7. Oil for frying

For gravy

  1. Onion – 3 medium-sized – chopped
  2. Ginger- 1” chopped fine
  3. Tomatoes – 2 medium-sized
  4. Cumin seeds – 1 tsp
  5. Turmeric powder – ½ tsp
  6. Red chilli powder – 1 tsp
  7. Coriander-cumin powder – 2 tsp
  8. Garam masala – ½ tsp
  9. Fresh grated coconut – 1 tbsp
  10. Green chillis – 2
  11. Chopped coriander leaves – 1 tbsp
  12. Fresh curd – 2-3 tbsp
  13. Fresh cream – 1 tbsp
  14. Almond/cashews – 11/2 tbsp – soaked in hot water and blanched
  15. Salt to taste
  16. Sugar – 1 tsp
  17. Milk – ½ cup
  18. Oil – 2-3 tbsp
  19. Saffron – a few strands (crushed)
Method 
Kofta 

  1. Wash and peel and grate the bottle gourd. 
  2. Squeeze out the water completely (and drink it - good for health).
  3. Take grated lauki in a bowl and add besan, salt, asafetida, coriander powder and red chilli powder and mix to a thick paste (adding more besan if needed). Do not add water.
  4. Immediately make balls and fry in hot oil till uniformly golden brown.
  5. Arrange the koftas in a serving dish.
                                
Gravy  

  1. Heat a tsp of oil in a kadhai.
  2. Add cumin seeds. When they splutter, shake in a little asafetida. 
  3. Add chopped onions and ginger.
  4. Fry till translucent. 
  5. Cool and then grind in a mixer and set aside.
  6. Cut each tomato into half. Boil in half a cup of water till soft. 
  7. Cool, remove skin, blend in a mixer and set aside.
  8. Grind blanched almonds, coconut, green chillies, coriander, and curd and keep aside.
  9. Heat the remaining oil.
  10. Add the onion paste and fry. 
  11. Add turmeric, red chilli powder, and coriander-cumin and garam masala powders.
  12. Add salt and sugar and fry for a minute.
  13. Add tomato paste and fry till oil separates.
  14. Add ground almond-coconut paste and boil for a minute.
  15. Add milk.
  16. Add water as per required consistency and taste.
  17. Bring to a boil. 
  18. Add saffron strands, and let it simmer.
  19. Add whisked cream. Stir and turn off the flame.
  20. After 2-3 minutes, pour over the koftas.
This tastes good with chapathi, puri, and pulao.


Tips 
If you are hard-pressed for time, you can prepare the masala gravy (till the step 'add tomato paste and fry till oil separates') and divide it in two portions - use one for 'matar paneer' / vegetable kurma and the other for 'kofta' 2-3 days later! Howzat?!

 
© Copyright 2011. Brinda Balasubramonian.

Friday, December 13, 2013

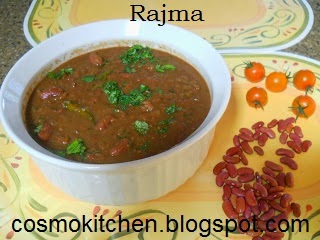
RAJMA


Rajma - like chole / chana - is a typical Punjabi recipe - made with the lentil rajma (kidney beans). The recipes for both are similar. Rajma-chawal is a typical combo that Punjabis relish. But all of us at home relish Rajma with pulao /rice as well as puri / chapathi.

Serves 6


Ingredients

  1. Rajma (kidney beans) - 2 cups 
  2. Bay leaves - 1-2
  3. Onion – 2 medium sized – chopped fine
  4. Ginger – ½” – chopped fine / grated 
  5. Garlic paste – ½-1 tsp
  6. Green chilli – 2 - 3 - slit
  7. Tomatoes – 3 medium sized
  8. Turmeric powder – ½ tsp
  9. Red chilli powder – 1 tsp
  10. Coriander powder – 2 tsps
  11. Cumin powder – 1 tsp
  12. Garam masala / rajma masala – 1- 1 ½ tsp
  13. Cumin seeds – 1 tsp
  14. Asafetida – a pinch
  15. Salt to taste
  16. Oil – 2 - 2 1/2  tbsp
  17. Coriander leaves – chopped fine – 2 tbsp
Method

  1. Soak the kidney beans overnight.
  2. Wash it well.
  3. Pressure-cook the kidney beans with turmeric powder and 2 bay leaves with sufficient water covering it.
  4.  After the first whistle lower the heat and let it cook for 8 -10 minutes. 
  5. Allow to cool.
  6. Meanwhile, finely chop onions and ginger and slit green chillies.
  7. Cut each tomato into two, put them in a mixer and blend well. 
  8. Heat 1½-2 tbsp oil in a kadhai and add cumin seeds. When they splutter, add a pinch of asafetida.
  9. Add the finely chopped onions and fry. When translucent, add chopped ginger-garlic paste and green chillies.
  10. Fry till onions are light brown.
  11. Add turmeric powder, coriander-cumin powders, red chilli powder and garam masala and fry for a minute.
  12. Add the tomato puree and continue on a medium heat till oil leaves the sides, stirring in between. (Add ½ tbsp of oil if required.)
  13. Lightly crush the pressure-cooked kidney beans and add them along with the water to the paste.
  14. Boil on high heat for 3-4 minutes.
  15. Allow to simmer on low heat for 8-10 minutes and turn off the heat.
  16. After 10 minutes, garnish with coriander leaves.
  17. Serve hot with chapathis / puris or jeera rice – with a slice of lime and finely chopped onions.
                                        
Tips

  1. If you feel it is less tangy, you can add required amount of lime juice or amchur (dry mango powder) / a drop of tamarind paste.
  2. If you are a busy professional, you can prepare the gravy (twice the quantity is ideal) and store it in the fridge. You can use it for two different recipes (preferably on alternate days) – may be dal / aloo matar / matar paneer / chana etc.
  3. You can prepare Rajma even if you haven't planned beforehand by doing the quick soak - take a liter of water in a big vessel, add the rajma and boil it for 4-5 minutes and keep covered for 2-3 hours. Wash it and pressure-cook it for 10-12 minutes and proceed.
  4. Those of you based in the West can go for canned kidney beans, wash them in a colander and add to the gravy prepared and boil and simmer well. This can be resorted to in case of quick-cooking. Making it from scratch is always healthier and tastier!
© Copyright 2011. Brinda Balasubramonian.
FALAFEL & FALAFEL SANDWICH


My daughter-in-law had soaked chickpeas (kabuli chana) before leaving for office. I didn't get time to ask her if she wanted me to pressure-cook it for her before she returned. I know only two dishes with chickpeas - chole and chundal.  But the soaked quantity would not suffice for the entire family, so I had my own doubts . So I called her up around lunch time and she said she was planning to make 'falafel' for dinner. Wonderful - a new dish, my blogger-mind was exhilarated. I have had falafel at Mediterranean restaurants and loved the taste. Who will not? It tastes so very similar to dal vada / masala vada. She made a dip with Tahini sauce and chopped cucumbers and tomatoes and greens and made yummy sandwiches for dinner. The kids gobbled them up, not to mention the adults and it was a nutritious meal, alright! Thanks Parvathi for this yummy recipe!

Makes 18 - 20 nos.
Ingredients

  1. Chickpeas (kabuli chana) - 1 cup
  2. Coriander leaves (chopped) - 1/2 cup
  3. Parsley (chopped) - 1/2 cup
  4. Onion (chopped) - 1/4 cup
  5. Garlic (optional) - 1 pod
  6. Coriander powder - 1 1/2 - 2 tbsp
  7. Salt to taste
  8. Oil for frying
Method

  1. Soak chickpeas in water for 10-12 hours.
  2. Drain off the water.
  3. Grind chickpeas, coriander leaves and powder, parsley, and chopped onions and garlic and grind somewhat coarsely without adding water.
  4. Remove and add salt and mix well.
  5. If there is extra water, squeeze out the excess.
  6. Heat oil in a kadhai.
  7. Make balls and add them gently in the oil and fry on medium heat till uniformly brown.
  8. Drain off on a tissue.
  9. Serve hot with a dip of your choice or use them to make sandwiches with buns.


Tips

  1. Make sure to remove traces of water by squeezing it out.
  2. You have to be very careful when you fry the falafel - once the oil is hot, gently drop the balls one by one and fry them on medium heat, taking care to flip them one by one - only after the bottom part has browned. Otherwise they will break and fall apart.
  3. Fry the entire batch - we made the mistake of setting away some of it to make a fresh batch the next day. but the balls fell apart!

FALAFEL SANDWICH


Ingredients

  1. Buns - 6-8
  2. Tomato (chopped) - 1/2 cup
  3. Cucumber (chopped) - 1/2 cup
  4. Onion (chopped fine) - 2 tbsp
  5. Chopped coriander leaves - 1 tbsp
  6. Salt to taste
Dip

  1. Tahini sauce (available in stores in the US) - 2 tbsp
  2. Whisked fresh yogurt - 1 1/2 - 2 tbsp
  3. Lime / lemon juice - 1/2 - 1tsp
  4. Salt to taste
  5. Water as needed
  6. Salad leaves (parsley / spinach) finely chopped
Method

  1. Mix the chopped veggies in a bowl and set aside.
  2. Mix the ingredients for the dip in another bowl.
  3. Slit each bun.
  4. On one half, spread a layer of the veggies, place one or two falafels over that and drip some of the prepared dip all along.
  5. Spread a tsp of chopped parsley - spinach leaves on the second half and place this over the other half to make a sandwich. Enjoy!


© Copyright 2011. Brinda Balasubramonian.

SHRIKHAND


Shrikhand is a Maharashtrian delicacy - prepared on most functions and festivals. Puri-Shrikhand is the ideal combo but you can also polish off a bowl of shrikhand as dessert.

When I first landed in Pune and found the people go ga ga about this combo, I also helped myself to it at a get-together but was disappointed at the sweet-sour shrikhand, having been used to puri-chana and puri-masala and even puri-chutney! But eventually my taste-buds got adjusted to the typical taste and in fact relishing it. I don't need to add that I gorge unabashedly a bowl (or more) of shrikhand.

Shrikhand is made out of 'chakka' - it is available in local dairies / sweet shops in Maharashtra. But you can easily prepare it from scratch at home - from thick fresh yogurt.
                          

Serves 2

Ingredients

  1. Fresh thick yogurt - 2 cups
  2. Powdered sugar - 1/2 - 3/4 cup
  3. Saffron strands - 10
  4. Cardamom powder - 1/4 tsp
Method

  1. Hang 2 cups of fresh, thick yogurt in a thin cloth / muslin bag for 2-4 hours. This will yield you 1 cup of chakka.
  2. Transfer it to a bowl and add 1/2 cup of powdered sugar and mix / blend well.
  3. Add saffron threads (crushed in a tablespoon of warm milk) and cardamom powder and mix well.
  4. Refrigerate the shrikhand.
  5. Serve chilled with puri / chapathi /as dessert.

© Copyright 2011. Brinda Balasubramonian.


Wednesday, September 11, 2013

BLUEBERRY JAM, RASPBERRY JAM & PEACH JAM


Raspberries and blackberries are not a common sight in India. No prizes for guessing how this recipe finds place in my blog! Yep, we are holidaying in the US visiting our sons. This recipe is for all my friends residing in the West. Trust me, you'll love trying this simple recipe for yummy 'berry' jam. Your thanks will be credited along with mine to my son's account.

When we landed in Salt Lake City, my son was excited to take us for berry-picking. They had made a previous round and he had donned the chef's apron and made raspberry and black berry jam with freshly plucked berries. It had turned out yummy of course but the more interesting fact was that it was not laborious but exciting as it was a family venture! Little wonder that he was waiting for the weekend for raspberry and blackberry picking at a farm, an hour's drive from home. We got to pluck luscious peaches too. It being September, strawberry season was unfortunately over!

Family berry-picking .....
                                     
Right from 70 year old grandpa to 2 plus grand daughter, everyone enjoyed plucking the biggest and juiciest berries. We paid for them, gobbled quite a few and still had plenty for the 'jam program'. My son called himself the best 'jammer' and started on the mission soon after reaching home. And I was the eager onlooker - for once!

It was nice to watch him at it - so meticulously and methodically going about it step-by-step, enjoying every minute of the mission which was a pleasurable experience as it turned out to be a family affair with even the littlest member pitching in!
                                  
RASPBERRY JAM

Raspberries are a very delicate berry variety. The dark red ones are very sweet. I prefer the bright red / orange-red ones which have a bit of sourness to it. When you are plucking for jam-making, you can include the slightly sour ones too for enhanced taste. The same applies if you are buying from a store.

Ingredients                     

  1. Washed and fully drained raspberries – 5 cups (on crushing it measures 2 3/4 cups)
  2. Sugar – 2 3/4 cups
  3. Lime juice – 1 tbsp                                    
Method

  1. Measure out 5 cups of washed and fairly dried raspberries.
  2. Crush them gently with a potato masher – anyway you won’t end up with chunks as raspberries are very small and delicate and will get mashed at the end of the jamming process. Measure this - it will be around 2 3/4 cups.
  3. Place them in a large heavy-bottomed pan and heat on medium heat, stirring in between.
  4. Add 1 tbsp of lime juice.
  5. Once it starts boiling, allow it to boil for 2 minutes, stirring all the time.
  6. Add sugar and continue to heat, as you keep stirring.
  7. Continue to boil for 2 minutes.
  8. Remove from the stove – it will not be very thick – it will thicken on cooling.
  9. Test for the right consistency by pouring out a spoonful on a plate and allowing it to cool. If it is not thick enough, heat it for a few more minutes till it is a bit thick and shiny.
  10. Allow it to cool.
  11. Store in clean, dry bottles in the fridge.
Juicy raspberries ready to be 'jammed' ....
a gentle mash ...
                                         
Boiled and sugar added ....

The final boil .....
                           
Check the consistency ....
The jam is ready
                                                   
All bottled and ready to be refrigerated .....
Note

  1. Make sure that the jam does not get too thick but should be of thick pouring consistency as it will thicken on cooling.
BLACKBERRY JAM


Ingredients

  1. Black berries (cleaned, drained and lightly crushed) – 5 cups
  2. Sugar – 4 1/2 - 5 cups
  3. Pectin – 1 pack dry (1 3/4 oz)
Method


  1. Put the black berries in a large thick-bottomed pan and mash them just a bit (so that you can taste the chunks in the jam).
  2. Place the pan on the stove on medium heat, and immediately add Pectin little by little, stirring in between.
  3. When the mixture starts boiling, allow it to boil for 2 minutes continuously stirring all the time.
  4. Then add the sugar and stir.
  5. Continue heating till the sugar dissolves and boil for 2-3 more minutes, stirring all the while.
  6. Turn off the heat and remove the pan – the jam will not be too thick.
  7. Allow it to cool – it will thicken on cooling. It will be like fruit spread.
  8. Store in clean, dry bottles and keep refrigerated.
cleaned juicy blackberries

On the stove, with pectin added....

After adding sugar ...
The enthusiastic bottling agents ....
                                  
Yummy .....
Note

  1. If the jam is too liquidy, you can heat it for a few more minutes and allow it to cool.


PEACH JAM


The large chunky, juicy, and temptingly luscious peaches plucked from the farm were so irresistible that we ended up churning out peach jam too. And they were a hit too! And with so many varieties jam stacked in the fridge, it was a different variety every time with bread sandwiches, chapathi rolls and even biscuit sandwiches!

Makes 1 big bottle (12 oz)

Ingredients

  1. Peaches – 4-5 (5 cups chopped pieces)
  2. Sugar – 2 -2 ¼ cups
  3. Lemon juice – 1 ½ tsp

Method

  1. Wash, peel, pit and chop peaches and measure out 5 cups into a large heavy-bottomed stainless steel bowl.
  2. Add sugar and lemon juice.
  3. Mix the ingredients and let stand for an hour.
  4. Bring to full boil on fairly high flame, stirring in between.
  5. Boil for 25 minutes – stir often and then constantly as you near jell-point.
  6. Remove from stove.
  7. Cool and store in clean, dry bottles and keep refrigerated.


© Copyright 2011. Brinda Balasubramonian.

Friday, September 6, 2013

RAVA IDLI


Whenever I used to hear about Rava idli, MTR would come to my mind - it was as if the item was synonymous with MTR! Not any more - because I have got a recipe for home-made rava idlis - and it has won rave reviews from my clan! Easy to make and cost-efficient, not to mention the joy of preparing from scratch! 

A slight variation is the addition of grated carrots - it makes the idlis more nutritious and gives it a pleasing orange color. You can make the traditional variety too - without grated carrots.
                                        

Makes 12 idlis

Ingredients

  1. Rava (semolina) - 1 cup
  2. Buttermilk - 1 1/2 cups (3/4 cup whisked curd mixed with 3/4 cup water)
  3. Ginger - 1/2 " piece (grated)
  4. Green chilli - 1 - 2 (finely chopped)
  5. Curry leaves - 10
  6. Coriander leaves (chopped) - 2 tbsp.
  7. Carrot - 1 medium sized - grated
  8. Salt to taste
  9. Mustard seeds - 1 tsp
  10. Urad dal - 1 tsp
  11. Chana dal - 1 tsp
  12. Red chilli (optional) - 2 -3 small pieces
  13. Asafetida - a pinch
  14. Cashew nut pieces (roasted) - 1-2 tbsp
  15. Oil - 1 tbsp.
  16. Eno fruit salt - 1 pouch (1 tsp - 5 gms)

Method

  1. Dry-roast the rava till it changes color and gives out a nice aroma.
  2. Transfer to a plate.
  3. Heat oil in a pan and add mustard seeds, urad dal and chana dal and red chilli pieces.
  4. When they splutter, add asafetida, green chilli, ginger and curry leaves and sauté for 1/2 minute.
  5. Add the grated carrots and fry for 2 minutes.
  6. Add the roasted rava and stir for 1-2 more minutes.
  7. Allow to cool.
  8. Pour the mixture into a bowl and add salt.
  9. Add 1 cup of buttermilk and stir well to get a smooth batter.
  10. Add the remaining buttermilk gradually to get a fairly thick batter.
  11. Add coriander leaves and mix well.
  12. Keep aside for about 30 minutes.
  13. Heat water in a pressure cooker and grease the idli-mould plates with oil.
  14. Now add Eno fruit salt to the batter and stir gently in one direction and mix well.
  15. Immediately pour the batter in each mould and place the idli stand in the pressure cooker and steam without the weight for 10 - 12 minutes.
  16. Allow to stand for 5-10 minutes.
  17. Scoop out the idlis and serve them hot with chutney / sambar / molagappodi.


Tips

  1. You have to use the batter totally at one go. So prepare as much batter that can be used for one set of idli plates you have.
  2. If you want to make 20 - 24 idlis, either use 2 idli stands simultaneously or prepare two sets of batter with a gap of 15-20 minutes.
  3. Finely grated cabbage can be used instead of carrots.
  4. The traditional Rava Idlis do not have grated carrots in them. So skip that step of adding carrots; the rest of the recipe is the same.

© Copyright 2011. Brinda Balasubramonian.


Thursday, July 4, 2013

PUNJABI KADHI

                     
This is the recipe for ‘Punjabi Kadhi’ – a tangy gravy made with sour curd and gram flour as main ingredients with onion pakodas tucked in it. ‘Kadhi – chawal’ is a favorite in Punjabi homes. We love kadhi with chapathis too.

‘Sindhi kadhi’ is different in the sense that it uses tamarind instead of curd and has vegetables instead of pakodas – it resembles ‘sambar’ but uses ‘gram flour’ instead of ‘tuvar dal’.

‘Gujarati kadhi’ uses buttermilk but it is sweet-n-sour and is just gravy.

Try this easy recipe for ‘Punjabi Kadhi’ – I suggest you try this when you make pakodas. Make 10-12 extra pakodas and use them to prepare ‘kadhi’!

Serves 2

Onion pakodas – 8 - 12


For gravy

Ingredients

  1. Sour curd – 1 cup
  2. Water – 3 ½ – 4 cups
  3. Besan (gram flour) – 2 - 2 1/2 tbsp
  4. Red chilli powder – 1 tsp
  5. Turmeric powder – a pinch
  6. Salt to taste
  7. Coriander seeds (crushed) – 1 tsp
  8. Fenugreek (methi) seeds – ½ tsp
  9. Cumin seeds – ½ tsp
  10. Asafetida – a pinch
  11. Oil – 1 ½ tsp
Method

  1. Whisk 1 cup curd and add 3 cups of water.
  2. Add red chilli powder, turmeric powder, salt and 2 tbsp gram flour.
  3. Mix well without lumps – either with your hand or with a whisk.
  4. Add ½ - 1 cup more water and mix well – it has to be watery as the gram flour needs to cook well.
  5. Heat 1½ tsp oil in a pan and add crushed coriander seeds, cumin seeds, fenugreek seeds and asafetida.
  6. When they splutter, lower the heat and add the gram flour mixture and keep stirring till it starts boiling.
  7. Continue to cook on a low flame (for 4-6 minutes), stirring all along so that it does not stick to the bottom.
  8. When the raw smell of gram flour is gone and it has got cooked and the gravy thickened, turn off the flame.
  9. After 3 minutes, add the pakodas and transfer to a serving dish.
  10. Serve hot with steaming hot rice / chapathi.
                                 
© Copyright 2011. Brinda Balasubramonian.